Today, taking a screenshot on Windows is a common task. Whether you need to capture the entire screen, capture screenshots of specific windows, or just a quick full-screen capture, it’s the perfect tool. Unfortunately, not everyone knows how to use this power tool. But in this simple guide, you’ll get to know all the quick ways Windows has for you!
At Nimble Nerds, we’re all about simplifying your tech life! Call our friendly receptionist, and we’ll have a skilled technician call you back within 30 minutes to discuss your request without any obligation. Moreover, we’ll give you quick estimates so you can easily book us with confidence!
In this guide, you’ll learn multiple methods for capturing screenshots, from using the classic Print Screen key to advanced tools like the Snipping Tool and Xbox Game Bar. In addition, you can use Snip & Sketch- a modern tool for taking screenshots that comes with more enhanced features and versatility.
So, are you ready to master the screenshot game? Let’s begin!
Quick and Easy: Mastering the Print Screen Key
During my early days as a tech support specialist, I had a client who was very frantic because they needed to take a screenshot of their entire screen for a work presentation in 5 minutes. Initially, he was taking photos of the monitor with their phone.
In cases like this, you can use the Print Screen key as your secret tool if you want to quickly capture the whole screen quickly. The print screen function (PrtSc keys) is like a camera built into your keyboard. In addition, you’ll find it on the upper right side or upper right corner of your laptop keyboards, while some may have you press the function key combination.
Here’s a method I use that helps all my clients: use the Windows key Print Screen keyboard shortcut (Windows key + PrtScn key). After clicking this, you’ll notice the screen will dim briefly- and that’s it! The screenshot will then be automatically saved to your Pictures> Screenshots folder. That means you don’t have to need Paint anymore.
Pro tip from someone who’s taken thousands of screenshots: If you only want to capture your active window (like that one error message you need to show IT), press Alt + PrtScn instead. It’s a game-changer when you don’t want to show everyone your messy desktop or private tabs!
Taking Control with the Snipping Tool: Your Secret Screen Capture
Back then, we used to explain computer problems over the phone. Totally uncool! That is why the Snipping Tool app has changed everything for me and my clients. So here’s the trick that can be your everyday game-changer.
- Open Snipping Tool by pressing Windows key + Shift + S, or search it from the Start menu. (I’ve got this shortcut taped to my monitor – no shame in reminders!)
- Watch as your screen dims, and look at the small toolbar at the top of the Snipping Tool window.

- Choose which style of capture you would like. You can begin by using the Rectangular Snip for precision.
- Click and drag your mouse over what you want to capture
Mastering Different Snipping Modes
Each snipping mode has its superpower, and after years of troubleshooting, I’ve learned exactly when to use each one:
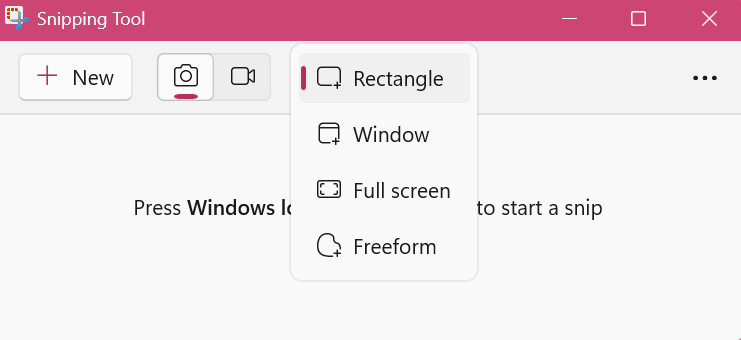
- Rectangular Snip: Perfect tool if you want to capture your desired area
- Click this and drag to select your area
- Release to capture
- This style is great for highlighting specific error messages that pop up on your computer’s screen.
- Free-form Snip: This tool is ideal for taking a screenshot of irregular shapes.

- Draw around your target area.
- This is best for taking a screenshot of curved elements or specific parts of an image.
- Window Snip: The perfect snipping tool shape for application issues on a specific window.
- Click any window to capture it completely
- No more awkward cropping needed
- Full-Screen Snip: As the name suggests, this will take a screenshot of your entire computer’s screen.
- One click captures your entire screen for a full-screen screenshot.
- Perfect for documenting multi-window processes.
Here’s a time-saving tip I discovered the hard way: after capturing, press Ctrl + S to save immediately, or Ctrl + C to copy to your clipboard. Trust me, nothing’s worse than taking the perfect screenshot and losing it because you forgot to save!
Gaming-Style Screenshots: Unleashing the Xbox Game Bar’s Hidden Powers
You know what’s funny? Some of my most tech-savvy clients don’t even know about this gem hiding in their Windows system. The Xbox Game Bar isn’t just for gamers – it’s actually a screenshot powerhouse in disguise that I’ve found incredibly useful for capturing tricky scenarios like dropdown menus and hover states.
- Open the Game Bar by pressing Windows key + G.
- Look for the “Capture” widget (it’s the one with the camera icon). In addition, you can also use the record button to create video clips.
- Click the camera icon or use Windows key + Alt + PrtScn for a quick and instant screenshot.
- Find the screenshot in This PC> Videos> Captures.
If you like to start recording a video clip, you can use another Snipping Tool feature. Start by highlighting a portion of the screen and clicking “Start” from the panel that appears. By doing this, you can capture videos of your screen. This includes options to include audio from the system or a microphone.
Pro Tips for Game Bar Success
Here’s something I learned after countless support calls: if the Game Bar isn’t responding, there’s usually a quick fix:
- Firstly, open your Windows Settings by clicking the Windows key + I.
- After, go to Gaming> Xbox Game Bar.
- Now, toggle the switch to ‘On’.
- Finally, make sure that the ‘Remember this is a game’ box is checked for your target application.
When doing these steps, remember that Game Bar has limitations, especially when recording the Windows desktop. That is why, if you are looking for a more comprehensive desktop recording, you might need third-party applications.
Just recently, I had a client trying to capture a crucial software bug that appears for a split second. The Game Bar’s background recording feature saved the day – we could scroll through frame by frame to find the exact moment the error appeared.
Pro tip that’s saved me hours: You can customise the keyboard shortcuts in the Game Bar settings. I’ve set mine to Windows key + B for instant captures – much easier than doing finger gymnastics with the default shortcuts!
Smart Shortcuts: Capture Your Active Windows
If you’re looking for the quickest way to document a 20-step software process, window by window, we’ve got the best way for you. Instead of having to capture everything and crop the files later, these game-changing keyboard shortcuts can help you finish this task easily and quickly.
- The Alt + PrtScn method: the best way to capture
- To do this, press this key combination once to capture your current active window.
- This method is the no extra screen clutter method for you.
- In addition, this will automatically save your file to the clipboard.
- Windows key + Alt + PrtScn: A quick capture
- This method instantly saves the active window screenshots.
- It also creates automatic file names for the screenshot.
- In addition, it stores the files in your Videos/Captures folder.
With these shortcuts, you can quickly and easily capture the active windows for more enhanced productivity and communication.
Here’s my tried-and-true workflow that I share with all my clients:
- Set up your window exactly how you want it
- Press Alt + PrtScn
- Hit Windows key + V to open clipboard history
- Either paste directly or save multiple captures for later
Pro tip from years of remote support: If you’re using a laptop and these shortcuts aren’t working, check if you need to use the Function (Fn) key. I can’t tell you how many times this simple check has saved both me and my clients from screenshot frustration!
Quick Fixes for Common Keyboard Shortcut Issues
Trust me, I’ve seen every screenshot hiccup possible. Here’s how to fix the most common ones:
- Nothing happening when you press PrtScn?
- Check if you need the Fn key
- Verify your keyboard isn’t in F-lock mode
- Make sure Windows is up to date
- Screenshots not saving automatically?
- Confirm your OneDrive settings
- Check your Screenshots folder permissions
- Ensure you have enough disk space
The Screenshot Detective: Finding and Organizing Your Captures
After years of helping clients track down their “lost” screenshots, I’ve developed a foolproof system for keeping track of these digital breadcrumbs. Let me share how to turn screenshot chaos into screenshot zen – something I wish I’d known when I first started in tech support!
Screenshots taken on Microsoft Surface devices are automatically saved in a designated folder, making it easy to locate them without any additional steps.
- Default Screenshot Locations:
- Pictures > Screenshots (for Windows key + PrtScn captures, accessible via File Explorer in the Pictures folder)
- Videos > Captures (for Game Bar screenshots)
- OneDrive > Pictures > Screenshots (if syncing is enabled)
Creating Your Screenshot Command Center
Here’s my personal organization system that’s saved countless hours of searching:
- Set up your foundation:
- Create a main “Screenshots” folder
- Make subfolders by project or date
- Pin your most-used folders to Quick Access
- When saving a screenshot, click file, enter a file name, select the save location, and click save
- Enable automatic sorting:
- Right-click your Screenshots folder
- Select “View” > “Show in groups”
- Choose “Date taken” for instant organization
Pro tip that I share with all my business clients: Use Windows’ built-in search operators. Type “kind:picture taken:today” in File Explorer’s search bar to find today’s screenshots instantly. I can’t tell you how many times this has saved me during urgent support calls!
Cloud Backup Mastery
One particularly stressful support call taught me the importance of cloud backups. Here’s my recommended setup:
- Configure OneDrive backup:
- Open OneDrive settings
- Select “Backup” > “Manage backup”
- Choose your Screenshots folder
- Enable automatic syncing to automatically save your screenshots
Remember, folks – nothing’s worse than losing that perfect screenshot because your computer decided to take an unexpected nap. Trust me, I’ve been there!
Wrapping It Up: Your Path to Screenshot Success
You know what still brings a smile to my face? When a client who once struggled with screen capture calls back to show me their perfectly organized screenshot collection. Taking great screenshots isn’t just about knowing the shortcuts – it’s about choosing the right tool for the job and keeping your captures organized.
Remember, whether you’re documenting an error message or capturing a whole presentation, Windows has built-in tools that make the job easier than taking blurry photos of your screen (yes, I still see this more often than you’d think!). Taking screenshots efficiently can significantly enhance your productivity. From the trusty PrtScn key to the sophisticated Snipping Tool, you’ve now got a complete toolkit at your disposal.
Frequently Asked Questions- How to Screenshot on Windows
Q: Why isn’t my Print Screen key working?
A: First, try holding the Fn key while pressing PrtScn. If that doesn’t work, check if your keyboard’s F-lock is enabled. For Microsoft Surface devices, you can use the Windows logo button in combination with the volume down button to capture the screen. Still no luck? Give us a call at 02 8091 0815, and we’ll sort it out together!
Q: How do I capture a scrolling webpage?
A: The built-in tools don’t capture scrolling pages, but here’s a workaround:
- Press Windows key + Shift + S
- Take multiple screenshots as you scroll
- Try using an image editor to stitch the images together. Or if you’re still having a hard time, you can still give us a call- we can recommend you some great third-party tools! But first, remember to manually save each of your screenshots so you can have them when we get to you.
Q: Can I change where my screenshots are saved?
A: Absolutely! Here’s how:
- Firstly, open your device’s Settings> System> Storage.
- Secondly, click the “Change where new content is saved”.
- Thirdly, you can choose which of the folders is your preferred location for your screenshots.
- In addition, if you’re using Paint, paste your screenshot into the Paint window. Afterwards, use the ‘Save As’ dialog box to choose your preferred location.
Q: Why are my screenshots showing up in OneDrive instead of my local folders?
A: In general, OneDrive is the default location for your files. However, if you want to change this, you can;
- Firstly, right-click the OneDrive icon in your taskbar.
- Secondly, go to your device’s Settings> Backup.
- Thirdly, uncheck the ‘Screenshots’ if you prefer local storage.
- Alternatively, you can also use Microsoft Paint to edit your screenshots and select print directly from the application after capturing your chosen area.
Remember, at Nimble Nerds, we’re always here to help! Whether you’re struggling with screenshots or facing any other tech challenges, give us a call at 02 8091 0815. We’ll have a friendly technician call you back within 30 minutes to walk you through any tech hurdles you’re facing.