Have you ever experienced needing to scan a document from your printer to your computer, only for you to be unsure how to do it? “I’m stuck”, you tell yourself. Well, don’t worry, you’re not alone and we TOTALLY understand you. That’s why, we made this guide to help you understand the entire process. And by the end of this, you’ll surely scan like a pro, whether in Windows or Mac.
When something’s not working and you’ve tried everything, we step in. Our Sydney-based techs solve everyday computer problems with patience, clarity, and zero condescension.
Talk to a Computer Help ExpertHow to Scan a Document from Printer to Computer: The Basics

Scanning documents from printer to computer is actually easier than it seems to be at first, but it is best for us to truly understand and cover the basics before we get into the complex details of this process. To begin the process, you’ll need a scanner, which usually comes as part of an all-in-one printer (print, scan, copy and fax). At times, some printers are just scanners designed for document digitization. But, whatever type of scanner you have, the process remains almost similar all throughout.
One thing to keep in mind: make sure your printer’s drivers are up to date. This is because outdated drivers can affect the scanning process or block your device from the computer, thus not recognizing it. To avoid this, you can visit the manufacturer’s website and update your printer’s latest drivers. Most of the time, this step solves half of the problems you have when scanning.
In addition, modern printers use a USB cable or wireless connection to connect to computers. So, before starting anything, make sure to check these ones, too! Now that you’ve got the basics, let’s move on to how to scan documents on different systems!
Scanning Documents on Windows Computers
If you’re on a Windows PC, there are a couple of built-in tools that make scanning a breeze. The two most common options are “Windows Fax and Scan” and the “Windows Scan” app from the Microsoft Store. Both work great, but they each have their own perks depending on your needs. Let’s break down how to use them.
Using Windows Fax and Scan
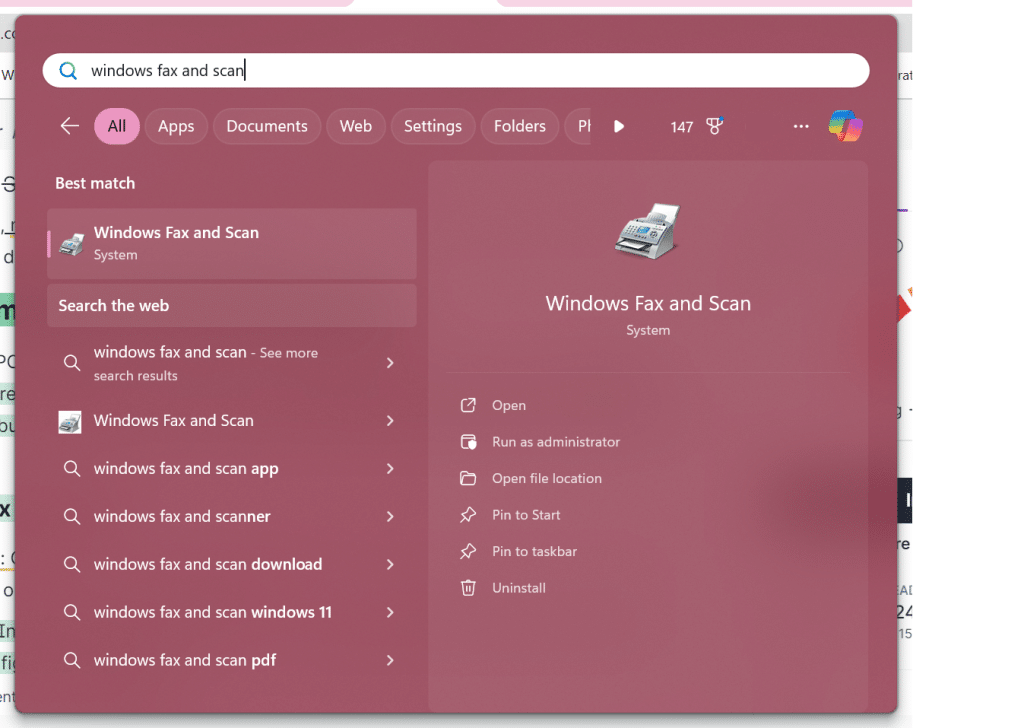
- Open the Program: Click the Start menu and type “Windows Fax and Scan.” Open it up, and you’ll see a window with options for scanning and faxing.
- Select New Scan: In the top left, click on the New Scan button. This opens a new scan window where you can configure the settings.
- Choose Your Scanner: If you’ve got multiple scanners or all-in-one printers connected, pick the right one from the Scanner drop-down menu.
- Adjust Settings: Here, you can select the file type (like PDF or JPEG), the color format (color, grayscale, or black and white), and the resolution. For important documents, I recommend going with at least 300 DPI to get a clear, high-quality scan.
- Scan and Save: Click Scan, and your document will appear in the main window once it’s processed. Right-click the scanned file to save it to your chosen folder. Pro tip: Choose a destination folder you’ll remember—there’s nothing worse than losing a document you just scanned!

Using the Windows Scan App
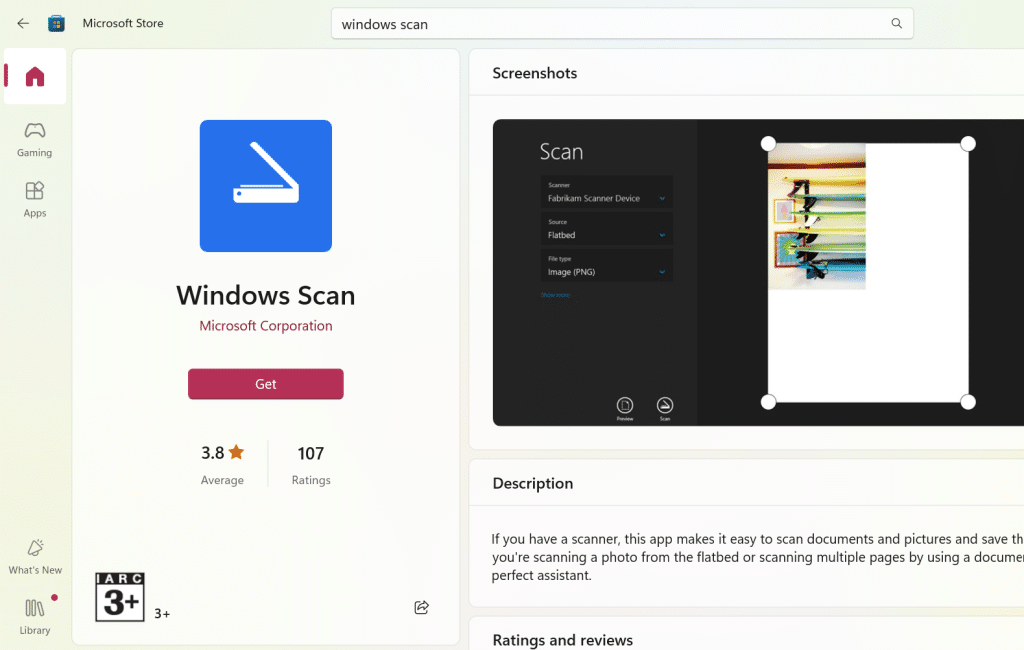
- Install the App: If you don’t have the Windows Scan app, grab it from the Microsoft Store. Just search “Windows Scan,” install it, and open the app.
- Configure the Scan: Select your scanner from the list, and set up the scan options. The app lets you pick the file type, resolution, and scan location, similar to Windows Fax and Scan.
- Start Scanning: Hit the Scan button. The scanned document will automatically save to your specified location. This app has a more modern look and is perfect if you prefer a straightforward, streamlined process.

Scanning Documents on a Mac
For Mac users, Apple has made scanning easier with a built-in “Image Capture” tool. Whether you’re scanning a single page or a stack of documents, Mac’s got your back! Here are steps on how you can make the most out of it.
How to Use the Built-In Image Capture Tool
- Open Image Capture: Choose and open “Image Capture” from the Applications. It’s a versatile tool that works with most scanners and all-in-one printers.
- Select Your Scanner: You’ll see your printer from the list on the left sidebar, select it. Make sure it’s connected via USB or the same Wi-Fi network as your Mac.
- Configure the Scan: In the main window, you’ll find various settings like Format (choose PDF if you’re scanning documents), Resolution (again, 300 DPI is usually a safe bet), and Scan To (select the folder where you want the file saved).
- Scan the Document: Make sure that your document is face-down on the scanner bed. After checking, click Scan. For scanning multiple pages, you can use the automatic document feeder (ADF). This way, you don’t need to manually place each page on the scanner bed.
How to Scan Multiple Pages into a Single PDF
If you’re scanning a multi-page document, it’s typically recommended to merge it into a single PDF file for convenience and organization. Here’s how:
- In Image Capture: Before starting, select Combine into a single document. This will merge all the scanned pages into one file automatically.
- Save and Organize: Remember to save and organize the document by selecting your location for the PDF file storage. Give it a unique and memorable name such as “Tax Documents 2024” to find it easily later.
Setting Up the System Preferences
Make sure your scanner is properly configured before starting the scan.
- System Preferences: To access your system preferences, navigate to System Preferences then select Printers & Scanners from the options available.
- Select Your Printer: Hit the Open Scanner button to proceed. Here, you will be able to utilize your scanning features or make adjustments as required.
Using the Printer’s Control Panel for Scanning
Lots of printers today have a control panel that lets you scan on it without the need for a computer or laptop. This feature is really convenient especially when you need to send scans directly to a computer or email address.
Starting the Scan from the Printer
- Power On the Printer: First, make sure your printer is connected to your computer (via USB or Wi-Fi) and powered on. If it’s a wireless printer, confirm it’s on the same network as your computer.
- Access the Control Panel: Commonly, all-in-one printers have an interface with buttons for navigation purposes. These buttons typically include options for scanning marked with a label, like “Scan,” or an icon resembling a document.
- Choose the Scan Destination: The control panel will ask you where to send the scanned document. Typically, your computer, email or cloud storage should be listed here for you to choose based on your preference. If you select your computer, ensure it’s the right one, especially if you’re in an office with multiple devices on the network.
- Select Scan Options: Here, you can pick the file type (PDF, JPEG, etc.) and resolution. If you’re scanning documents, for clarity and quality results, choose PDF format at 300 DPI resolution.
- Start the Scan: Place the document face down on the scanner glass or use the document feeder if you’re scanning multiple pages. Then, hit the Start or Scan button, and the printer will process the document.
Sending the Scanned Document from Printer to Computer
- To Computer: The scanned file will appear in the destination folder you’ve set on your computer. Most printers use default folders like “Documents” or “Scanned Files,” but you can change this in your printer’s software settings.
- To Email: If you’ve selected email as the destination, the printer will scan the document and prompt you to enter the recipient’s email address. This is great if you are sending documents quickly without the need to transfer files manually.
Using the printer’s control panel is a great option when you want to control the process right at the source.
How to Scan with a Document Feeder for Multiple Pages
If you’ve got a multi-page document to scan, your printer’s Automatic Document Feeder (ADF) is a lifesaver. Most all-in-one printers come with an ADF, allowing several pages to load at once and scan them automatically, without having to place each page on the scanner bed individually.
Here are steps on how to use it efficiently.
What is an Automatic Document Feeder (ADF)?

Automatic Document Feeder, or ADF, is usually found on many scanners and all-in-one printers. The ADF feeds documents into the scanner automatically, one page at a time. This is super helpful when you’re dealing with long documents or a stack of paperwork.
How to Use Your Printer’s ADF
- Prepare the Documents: Make sure the pages you’re scanning are free of folds, creases, and staples. ADFs can be a bit finicky if documents aren’t in good shape, so it’s worth taking a moment to straighten them out.
- Load the ADF: Place the stack of documents face up (or down, depending on your printer’s model) in the document feeder tray. Most printers have icons near the feeder that indicate the correct orientation.
- Adjust the Paper Guides: Make sure to adjust the paper guides by sliding them to fit the width and length of your documents properly. This will keep your pages aligned and prevent the chances of paper jamming when you’re scanning.
- Initiate the Scan: Start the scan by selecting ADF as the scan source from the control panel or the scanning software on your PC. Adjust settings to your preferences and hit Start Scan. Choose your preferred settings for the file type, resolution, and other options, and hit Start Scan. The ADF will then begin feeding the pages automatically in the scanner.
Tips for Using the ADF
- Double-Check the Order: The ADF scans pages in the order they’re placed, so double-check before you start scanning.
- Multi-Page PDF: If you’d like to have all the pages in one PDF file for each page when scanning documents into your computer system software program, choose the “Combine into single document” option.
An ADF speeds up the process of scanning multiple-page documents, making it quicker and more efficient than scanning each page individually.
Scanning Documents from Printer to Computer: Troubleshooting Common Issues

Even with the best equipment, sometimes, problems happen and scanning can go awry. For instance, the “printer not recognized” problem or the fuzzy scan results can take up more time and energy when doing this task. Don’t worry, though—I’ve seen (and fixed) it all! Here’s how to tackle some of the most common scanning problems.
What to Do If Your Computer Doesn’t Recognize the Printer
- Check Connections: First, check that your printer is properly connected.
- Restart Devices: At times, a simple restart can fix this problem. Power off your printer and computer and wait a few seconds before turning them back on.
- Update Drivers: Outdated or corrupted drivers can cause connectivity issues. Visit the printer manufacturer’s website, download the latest drivers for your printer model, and install them on your computer.
- Reinstall the Printer: Remove the printer from your computer’s devices list and add it again. On Windows, go to Settings > Devices > Printers & Scanners, and on a Mac, go to System Preferences > Printers & Scanners.
Fixing Blurry or Low-Resolution Scanned Documents
- Check Resolution Settings: If your scans look fuzzy, it is best that you check and adjust the resolution settings to a minimum of 300 DPI (dots per inch). This will make the scanned image look more visible and readable.
- Clean the Scanner Glass: At times, dirt and other particles may accumulate on your scanner glass over time. Remember to keep this glass clean to maintain high-quality images! Just simply open the lid and use a lint-free cloth and some glass cleaner to wipe away the glass surface.
- Align the Document: Make sure the document is placed flat and aligned properly using the paper guides on the scanner bed before scanning especially when you’re using an ADF.
Printer Not Showing in Scanning Software
- Check Software: Make sure you’re using the right scanning software for your printer model. For example, if you’re using a Windows computer, use “Windows Fax and Scan” or the “Windows Scan” app.
- Network Issues: If your printer is on the network but not showing up, it might be a Wi-Fi issue. Try restarting your router and double-check that both your computer and printer are connected to the same network.
- Firewall Settings: Sometimes, firewalls and antivirus may restrict the connection between your computer and printer. Check your security software settings to see if it’s restricting access.
With these troubleshooting steps, you’ll tackle those pesky scanning problems like a pro.
Scan Documents from Printer to Computer- FAQs
To transfer a scanned document from your printer to your computer successfully, make sure that your printer is linked either through a USB connection or over the Wi-Fi network. Then, launch the scanning program on your computer. Go for “Windows Fax and Scan ” on Windows OS platforms or opt for the “Windows Scan” app. For Mac users, use the “Image Capture”. Position your document onto the scanner bed or into the Automatic Document Feeder (ADF), adjust your scanning preferences such as file format and resolution settings and hit the button to initiate the process. After scanning, the document will be saved in the folder of your choice on the computer.
The steps are pretty simple! Start by placing the paper face down on the scanner bed or in the ADF tray (Automatic Document Feeder). Then, open the scanning program on your computer (such as “Windows Fax and Scan” or “Image Capture”, on a Mac). Choose your file format (PDF or JPEG) and then select the folder where you’d like to store the document before hitting the Scan button; this will have your document uploaded to that folder automatically.
There are two ways to do this:
- From the Printer’s Control Panel: Many all-in-one printers have an option to scan directly to an email. On the printer’s control panel, choose the Scan to Email option. Enter the recipient’s email address and configure any necessary settings. The printer will scan the document and send it as an attachment.
- From Your Computer: Scan the document to your computer first using the scanning software. Once saved, open your email, create a new message, and attach the scanned document file. This method offers more control over how the file is sent.
When configuring your settings, opt for PDF as the file format. If you’re on a Windows system, you can accomplish this in the “Windows Fax and Scan” or “Windows Scan” application by selecting PDF in the file type options. On a Mac computer, use “Image Capture”, and pick PDF from the “Format ” menu. After scanning is complete, your document will be stored as a PDF in the designated folder of your choice. Subsequently, you can attach this PDF to an email and share it accordingly.
When something’s not working and you’ve tried everything, we step in. Our Sydney-based techs solve everyday computer problems with patience, clarity, and zero condescension.
Talk to a Computer Help Expert


