Need to transfer files from one PC to another? Whether you’re upgrading to a new computer or simply sharing data, transferring files can be tricky if you don’t know where to start.
Understanding the Basics of File Transfer

Before diving into the methods for transferring files, let’s go over some basics that will set you up for success. Imagine this as a “pre-flight checklist” for a smooth data transfer process.
Losing files? Running out of space? Whether you need help recovering lost data, setting up cloud storage, or just making sense of your digital clutter — we’ve got your back.
Explore Our Data Management Services
File Transfer Method Selector
1. What’s the total size of files you need to transfer?
2. Are both computers on the same network?
3. How quickly do you need to transfer the files?
Recommended Method
The Importance of File Transfer on Data Security
When upgrading to a new computer or backing up important documents, transferring files ensures you don’t lose valuable data. Other than the convenience it offers, it is important for maintaining continuity and security. Moreover, when a transfer gets botched and wrong, it makes you more vulnerable to data loss and other privacy breaches.
What to Consider Before Starting File Transfer
Before you start a file transfer, take into consideration these factors:
- File Size: Large files, such as videos or complex software, affect your file transfer. For example, some cloud storage devices are not able to store and handle these huge files without a paid subscription.
- Connection Speed: If you are experiencing WiFi issues or connection problems, we recommend you use a cable connection instead. This is because network speed is important for data transfer among computers within the same network.
- Storage Availability: Make sure that the computer you’re saving and transferring your files to has enough storage. Running out of space halfway through a transfer can cause data corruption or partial transfers—believe me, that’s a headache you don’t want!
Tools and Requirements for Transferring Files
You don’t need an advanced toolkit to transfer files; just a few essentials will get you started. Depending on the method, this could include:
-
- External Devices: USB flash drives, external hard drives, or portable SSDs.
-
- Internet Connection: For cloud storage or network transfers.
-
- Transfer Cables: For a direct cable connection (USB or Ethernet).
-
- File Transfer Software: Optional but great for large files or complex transfers.
How to Transfer Files from One PC to Another Using Cloud Storage (The Most Popular Method)

Cloud storage is an online filing tool that lets you access your files from anywhere. It’s a convenient way to transfer files, especially if you’re not in a rush and don’t want to deal with cables. Let’s take a look at the different ways cloud storage works for you:
Popular Cloud Services: Google Drive, Dropbox, OneDrive
With plenty of options there, the big three are still Google Drive, Dropbox, and OneDrive. Each offers a free storage plan (usually between 2GB to 15GB), with enough storage space for transferring small files. If you need room for larger files, they also offer plan upgrades. Check here and see their offers:
-
- Google Drive: With 15GB of storage on the free plan, this easily works between Android devices and Google services.
-
- Dropbox: Offers 2GB of storage and is known for its simplicity.
-
- OneDrive: Great for Windows users since it’s built right into the operating system. The free tier includes 5GB.
Step-by-Step Guide for Uploading and Downloading Files
1. Uploading Files to the Cloud:
-
- Sign In: Open your preferred cloud storage service, on your old PC and log in to your account.
-
- Upload: Click ”Upload” and choose the files or folders you want to transfer. You may have to wait for some time as this process depends on the file size and your internet speed to finish.
2. Downloading Files on the New PC:
-
- Sign In Again: On your new computer, open the cloud storage service and log in with the same account from the other computer you used.
-
- Download: Find the uploaded files and select “Download.” If you’re moving several large files, be patient—downloads can take time!
Ensuring Sufficient Storage Space and Security
When you transfer data, check your storage limits from time to time. For instance, if you’re transferring large amounts of data, clear up unnecessary files in your cloud or you can also consider upgrading your plan. In addition, protect these accounts with a strong and unique password and two-factor authentication.
Using External Storage Devices for File Transfers

External storage devices like a USB flash drive, external hard drives, and portable SSDs offer a simple, offline way to transfer files between PCs. They’re quick, reliable, and don’t require an internet connection.
First, connect your external storage device to the old PC. Once connected, open File Explorer (on Windows PC) or Finder (on Mac), then drag and drop the files you want to transfer into the device’s folder. Remember to eject the device after completion to avoid data corruption. After that, plug the external device into your new computer and copy all the data you want to transfer over.
For faster data transfers, use USB 3.0 or higher. Also, make sure your external drive has enough storage to handle all the files you’re moving.
Transferring Files via Direct Cable Connection
Using a direct cable connection is one of the fastest ways to transfer files between PCs. Unlike cloud storage or external drives, it doesn’t rely on internet speed, making it ideal for large file transfers.
First, you need a USB transfer cable or an Ethernet cable. Usually, a USB transfer cable’s built-in software will guide you through the transfer process. You can just simply connect the PCs with the cable and start the transfer software. If you are using Ethernet, use your network settings to make a local network between the two PCs and allow it to share files directly.
Wired transfers are great when it comes to speed. With it, you can transfer large data and files in minutes without the need of Wi-Fi or dealing with storage limits. It’s a great option if you’re moving large files or entire folders.
Network Transfer: Moving Files Over Wi-Fi or LAN (Advanced Method)

Moving files over Wi-Fi or a LAN cable is convenient when both PCs are on the same network. However, for this to work smoothly, a few settings need to be adjusted to make one computer visible to another and share specific folders securely.
To start, you will need both PC to be on the same network. Make sure that both are visible on the network. To do this, open the Control Panel>Network and Sharing Center>Change Advanced Sharing Settings. Don’t forget to check that the Network Discovery is turned on so the other devices on the same network will be able to see this PC.
Sharing a Specific Folder
Now, go to the folder you want to share and right-click on it, then click Properties, and go to Sharing. Click on Share and choose specific users or “Everyone” if you want full access. For more control, use the Advanced Sharing button, check Share this folder, and click Permissions to set who can access it and what they can do (read, write, etc.).
Adjusting Permissions in the Security Tab
At times, even after you shared the folder, you may still need to change permissions under Security tab to ensure proper access. To do this, click Edit and add your desired user or “Everyone”, then assign the necessary permission you will allow (Full Control, Modify, Read & Execute). Remember that this is important because, without the right permissions, the connected PC might not still access or modify the files they need.
Accessing the Shared Folder from the New PC
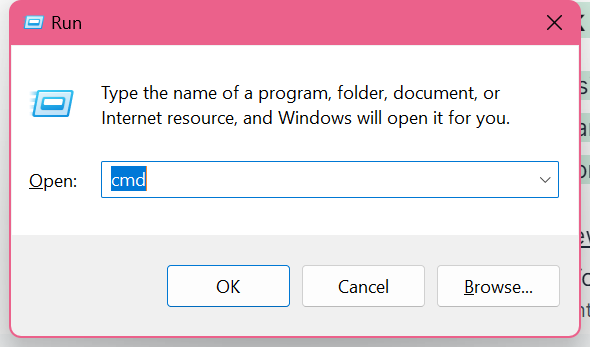
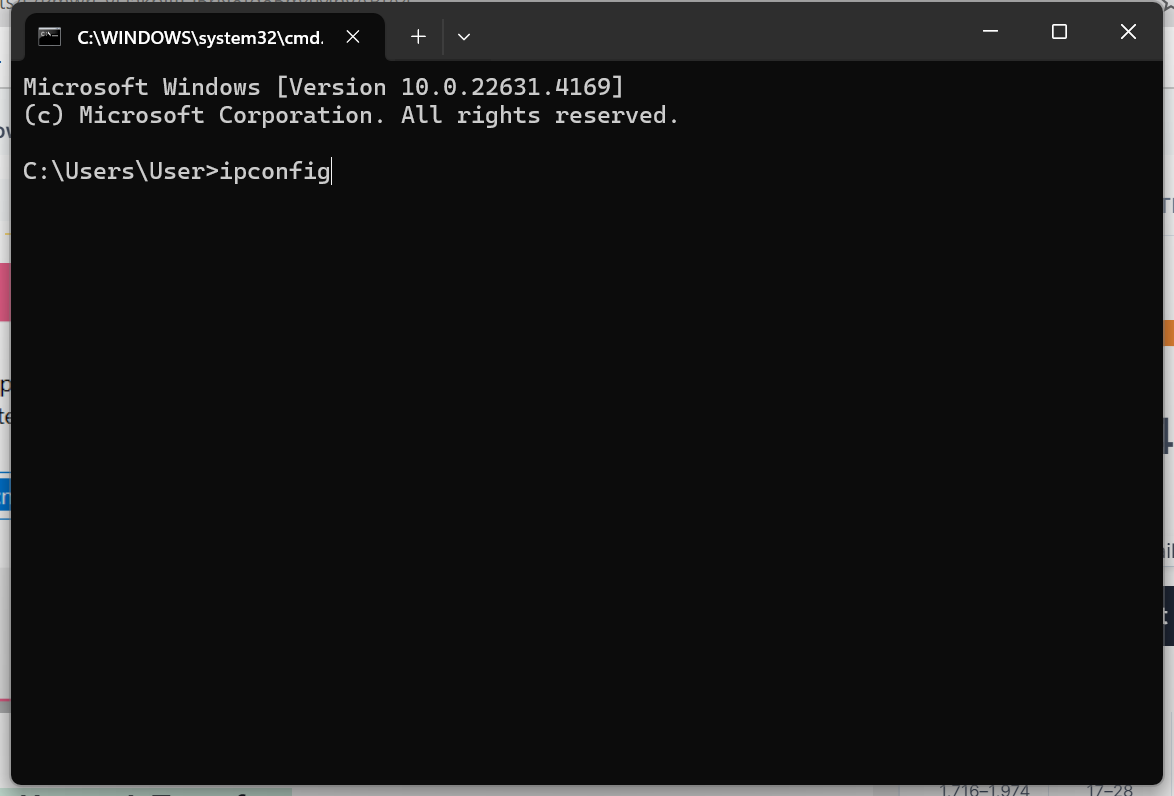
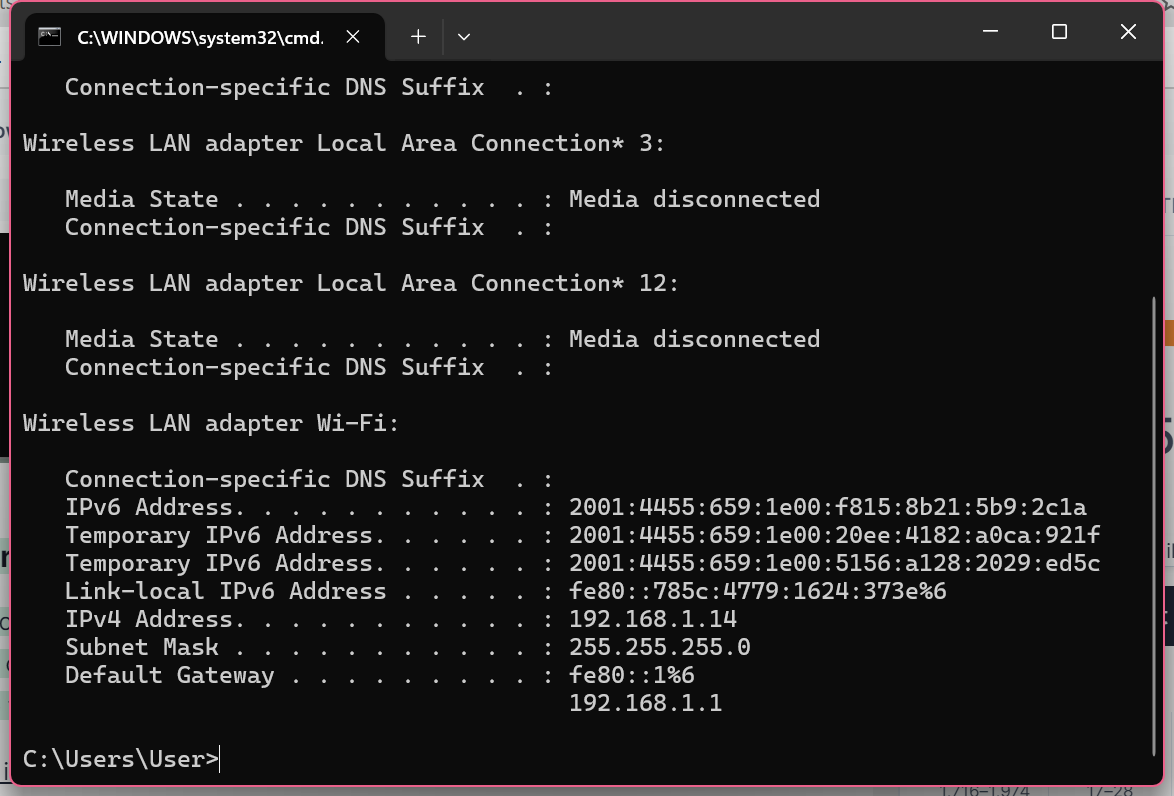
Next, you’ll need the IP address of the old PC. Open Command Prompt and type ipconfig, then press Enter. Look for the IPv4 Address; you’ll use this to access the shared folder. On the new PC, open File Explorer and in the address bar, type \\[IP address] (e.g., \\192.168.1.5). You should see the shared folder, allowing you to copy files over to the new PC.


Basic Troubleshooting for Network Transfers
If the new computer is having trouble accessing the shared folder, there could be a few reasons for the issue. First, make sure that both computers are connected to the network and that Network Discovery and File and Printer Sharing are turned on for both devices in the Network and Sharing Center.
One problem why these happen is due to firewall and antivirus configurations. In addition, antivirus programs also affect network connections. To fix this issue, try disabling the antivirus and test the connection. If the connection is successful after the antivirus software is disabled and unsuccessful once the software is enabled, you may have to tweak the settings and permit network connections or file sharing. Additionally, make sure your Windows Firewall settings allow File and Printer Sharing by navigating to Windows Security > Firewall & Network Protection > Allow an App through the firewall.
If you face any permission issues when accessing files or folders in a shared location on your computer network or server network drive, double-check the Security settings in the shared folder to confirm that the appropriate users or “Everyone” have been granted access rights. Additionally, verify that the sharing settings for the folder by IP address are accurate. If typing \\[IP address] (e.g., \\192.168.1.5) doesn’t work in File Explorer, try using the computer’s network name (\\[computer name]).
Transferring Data Between Different Operating Systems
Moving files between different and major operating systems, such as Windows and macOS, can seem tricky, but with the right steps, it becomes a breeze. Each operating system has its own method of handling these data transfers, so let’s break down how to move your files smoothly.
Ways to Share Files Between Windows and Mac
One way to move files easily between Windows and Mac is a shared network. On Windows computer, right-click your chosen folder then go to Properties > Sharing and modify permissions for access. Make sure that both systems are connected to the network before proceeding.
To access files from your Windows PC on a Mac computer, go to Finder, press Command + K, and enter the network address in this format; smb;//[IP address] such, as smb;//192 168 15.. You may need to provide your Windows username and password. Once done, you can transfer files from the shared folder to your Mac directly. As easy as that!
Tips for Transferring Files Across Different Platforms and Data Transfer Software Suggestions
You could also consider using platform file transfer applications such as EaseUS or TeamViewer for transferring data between various operating systems smoothly. These applications are known for its user-friendly design and compatibility features across different platforms like Windows and MacOS. In addition, you may also opt for portable external storage devices formatted in exFAT since both Windows and macOS can access and modify files stored in this file system seamlessly without encountering any compatibility problems.
Common Challenges and How to Solve Them
Other times, network transfers done between different operating systems can also be blocked by security settings. For you to troubleshoot and fix this issue: on a Mac, go to System Preferences > Sharing, and enable File Sharing to ensure your Mac is discoverable on the network. Similarly, on Windows, double-check that Network Discovery and File Sharing are enabled.
One thing to check is also the compatibility. At times, some file formats may not be supported on both systems. To address this issue, consider converting files to more universal formats, like PDFs or .mp4s, before transferring.
File Format Differences Between Windows and Mac
When moving files between Windows and macOS, be mindful of file format differences that can affect usability. While most common file types, like .docx, .pdf, .jpg, and .mp4, are cross-compatible, others may not work as seamlessly.
For example, Windows often uses the .exe format for software installation files, which is not compatible with macOS. Likewise, macOS uses .dmg files for installations, which won’t run on Windows PCs. When transferring software, you may need to find platform-specific installers.
File systems on external drives can also pose issues. Windows typically uses NTFS, while macOS uses APFS or HFS+. While Macs can read NTFS-formatted drives, they cannot write to them without additional software. To avoid this, format external drives as exFAT, a file system both Windows and macOS can read and write to without problems.
If compatibility issues arise, consider using universal file formats like .pdf for documents or .mp4 for media files before transferring. This will save time and avoid the hassle of finding software to convert or open files on the other system.
Best Practices for Secure Data Transfer
Remember to take the right precautions especially when transferring sensitive files. This helps the process to be more smooth and secure. and prevents data loss, corruption, or unwanted security breaches.
How to Safely Transfer Sensitive Data Using Encryption
If you’re moving personal documents or sensitive business files, encryption is key. You can use BitLocker (Windows) or FileVault (macOS) to encrypt all your data even before you transfer it. In addition, some external drives and file transfer software also offer a built-in data encryption, thus, adding that extra layer of security. By encrypting your files, even if someone intercepts them during the transfer, they won’t be able to access the information without the proper decryption key.
Common Pitfalls to Avoid When Transferring Files
One common mistake people make when transferring files is forgetting data backup. Before you transfer files, make sure you create a backup of existing files on an external drive or cloud storage. With this, you’ll still have your original files in case anything goes wrong during the transfer.
Another common mistake is overwriting files. When moving files, make sure to set up the right file destination or folder in the new PC to avoid accidentally overwriting and replacing important files. Additionally, make sure to check permissions, especially with network transfers, to avoid unnecessarily sharing access to sensitive information.
Ensuring All Data is Successfully Transferred
When all files have been securely and successfully transferred, check the files on the new PC and see if everything is moved correctly. Make sure to check folders, documents, and programs and open these if needed. If you are using a file transfer software, check the “transfer report” feature to properly verify the files’ status.
Conclusion

No matter what kind of file transfer you’re dealing with, there’s a method that fits your situation. Whether it’s cloud storage for smaller files, external storage for quick offline transfers, or direct cable connections for speed, understanding your options makes the process much less daunting. To summarize, network transfers are the best option when sharing files between device on the same network, while specialized software are able to handle and transfer large and complex data. But most importantly, always remember to start with the best practices by backing up data and using encryption to keep your sensitive files safe and secured.
Still unsure about the best approach for your specific needs? Want to learn more about your preferred file transfer method? Give our friendly team a call! Our experts at Nimble Nerds can help you choose the right method to make your file transfer stress-free and efficient.
FAQ
How do I transfer files directly from PC to PC?
The easiest way to transfer files and data is by a USB transfer cable or connecting the PCs via the same network and sharing the files through a shared folder. Furthermore, you can install transfer software like Laplink PCmover to help you with these transfers.
How do I transfer everything from my old PC to my new PC?
You can use file transfer software like EaseUS or Laplink PCmover to move all your files, programs, and settings in one go. A direct cable connection or network transfer is also suitable if you’re moving large amounts of data.
How to transfer files from one PC to another wirelessly?
First, connect both PCs to the same Wi-Fi network, then enable File Sharing on the old PC. Next, share the desired folder and access it now from the new PC using the network path, for example, \\[IP address]. Additionally, cloud storage services like Google Drive also offer a great wireless transfer experience.
Can I use a USB cable to transfer data between computers?
Yes! You can use a USB transfer cable to connect two PCs directly. Oftentimes, this cable comes with software to guide you through the transfer, helping you towards an easy and fast data transfer between two computers.
Losing files? Running out of space? Whether you need help recovering lost data, setting up cloud storage, or just making sense of your digital clutter — we’ve got your back.
Explore Our Data Management Services


