Scanning documents from your printer to your computer doesn’t need to be a daunting task! No matter if you are a tech newbie or just looking for more productivity, our guide here will surely help you master scanning. At Nimble Nerds, we simplify technology for you.
When something’s not working and you’ve tried everything, we step in. Our Sydney-based techs solve everyday computer problems with patience, clarity, and zero condescension.
Talk to a Computer Help ExpertPreparing Your Printer and Computer for Scanning
Before you start scanning, you first need to set up both your printer and computer properly. Trust me, there’s nothing worse than getting everything ready to scan, only to find out your devices aren’t talking to each other. So, let’s tackle this step-by-step.
Ensure Proper Connections: USB, Wi-Fi, or Ethernet

First things first, make sure your printer is connected to your computer. If you’re using a USB cable, plug it into both the printer and computer securely. For Wi-Fi depending printers, make sure both devices are connected to the same network. For Wi-Fi-enabled printers, double-check that both devices are on the same network. In addition, wired Ethernet connections are the most stable if your printer and computer are in a fixed location. To check the connection, open your printer’s settings on your computer; it should show as “Ready” or “Connected.”
Confirm the Printer’s Scanning Capabilities
Not all printers can scan documents. Check if your printer has a built-in scanner. Most multifunction printers, like Canon, Epson, or HP Officejet models, come with this feature. You can find this in your printer’s manual, comprehensive guide or the manufacturer’s website. If your printer model has a scanner bed or document feeder, you’re good to go!
Installing Necessary Scanning Software (Drivers, Applications)

Your printer won’t scan properly without the right software. Most printers come with a CD for drivers, but if you’ve lost it, no worries! Visit the printer manufacturer’s website to download the latest drivers. If you’re using an Epson, Canon, or HP, they often have a dedicated scanning app—install it. On Windows, you might not need extra software; the built-in “Windows Fax and Scan” app works fine for basic scanning.
How to Scan Documents Using Different Printer Models

Now, let’s break down the scanning process for some of the most popular printer brands. Every printer model has its quirks, so knowing these can make scanning a lot smoother. Whether you’re using an Epson, Canon, or an HP Officejet printer, these tips will have you scanning like a pro in no time.
Scanning from an Epson Printer
Epson printers are known for their easy-to-use scanning features. If you have an Epson, start by installing the “Epson Scan” software. Once installed, open the application and place your document face down on the scanner bed. If your printer has an automatic document feeder (ADF), use it for multi-page documents.
In the app, select “Home Mode” for simple scans or “Professional Mode” for advanced options. Choose your desired file format (PDF, JPEG, etc.), and hit the “Scan” button. You can also adjust resolution settings here for higher-quality scans, but be mindful that higher quality means larger file sizes.
Scanning from a Canon Printer
For Canon printers, “IJ Scan Utility” is your go-to software. Canon Printer makes this easy with a “Document” button on the app’s main screen. If you click it, the printer will start scanning. You can then choose where to save the scanned documents.
Try the “Photo” option in the app too. It automatically adjust settings for great image quality. Canon printers are also great for bulk scanning—just stack your papers in the ADF, and it will scan each page in order.
Using the Automatic Document Feeder for Scanning Bulk Pages
The ADF is a lifesaver when you have a lot of pages you need to scan. Load your documents into the ADF tray, making sure they’re neatly stacked and not folded or crumpled. On your computer, select the ADF option in your scanning software. This will then signal for the printer to pull in each sheet one at a time. Pro tip: Use ADF for text-heavy documents, as this can sometimes cause jam with glossy and thick paper.
A Step-by-Step Guide on Scanning from Printer to Computer (Windows)

If you’re a Windows user, scanning is a breeze once you know where to find the right tools. Here’s a detailed step-by-step guide to help you get those documents scanned and saved on your computer without a hitch.
Accessing the “Windows Fax and Scan” Tool
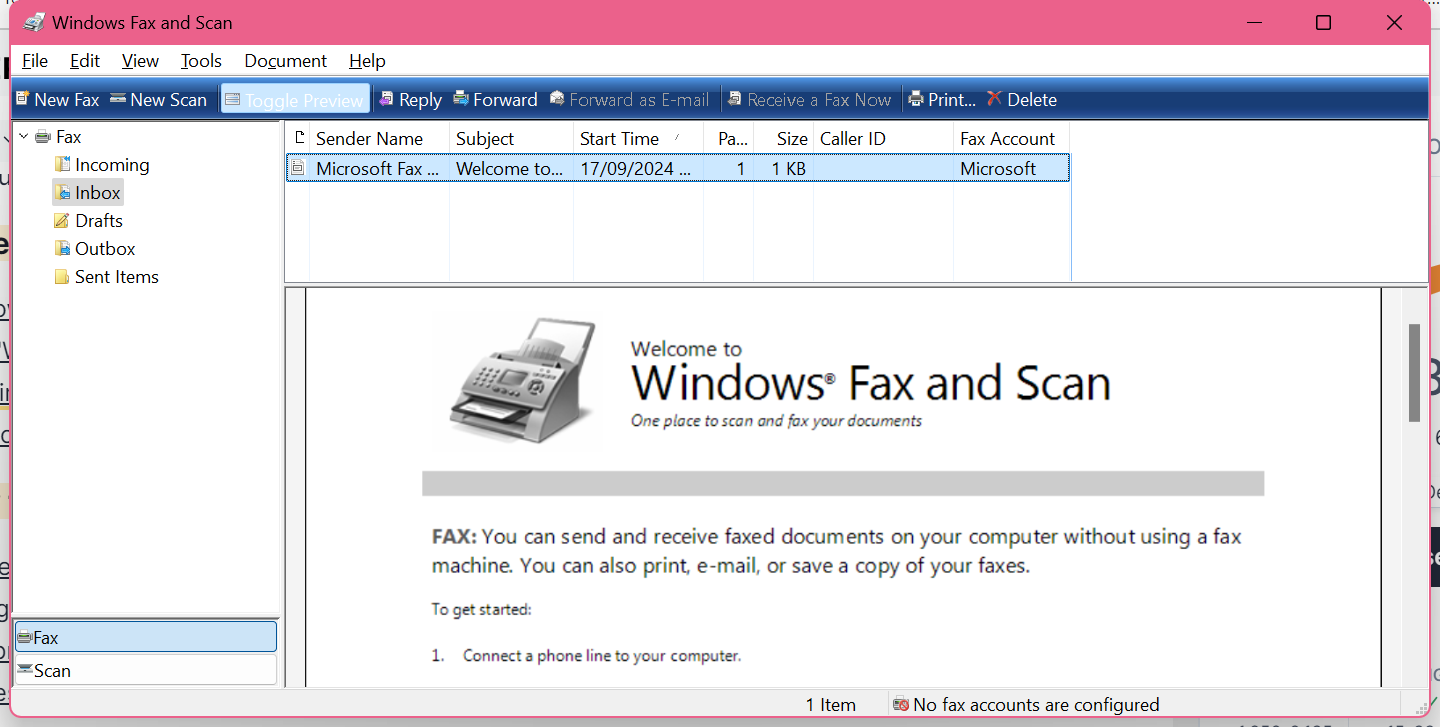
Windows has a tool called “Windows Fax and Scan”, this tool works with most printers. To access it, type “Windows Fax and Scan” into your Start menu’s search bar and open the application. If you are a first-timer in using this tool, click “New Scan” in the top-left corner and start the process. Make sure that your printer is the selected device in the new window.

How to Open Scanner from the Control Panel
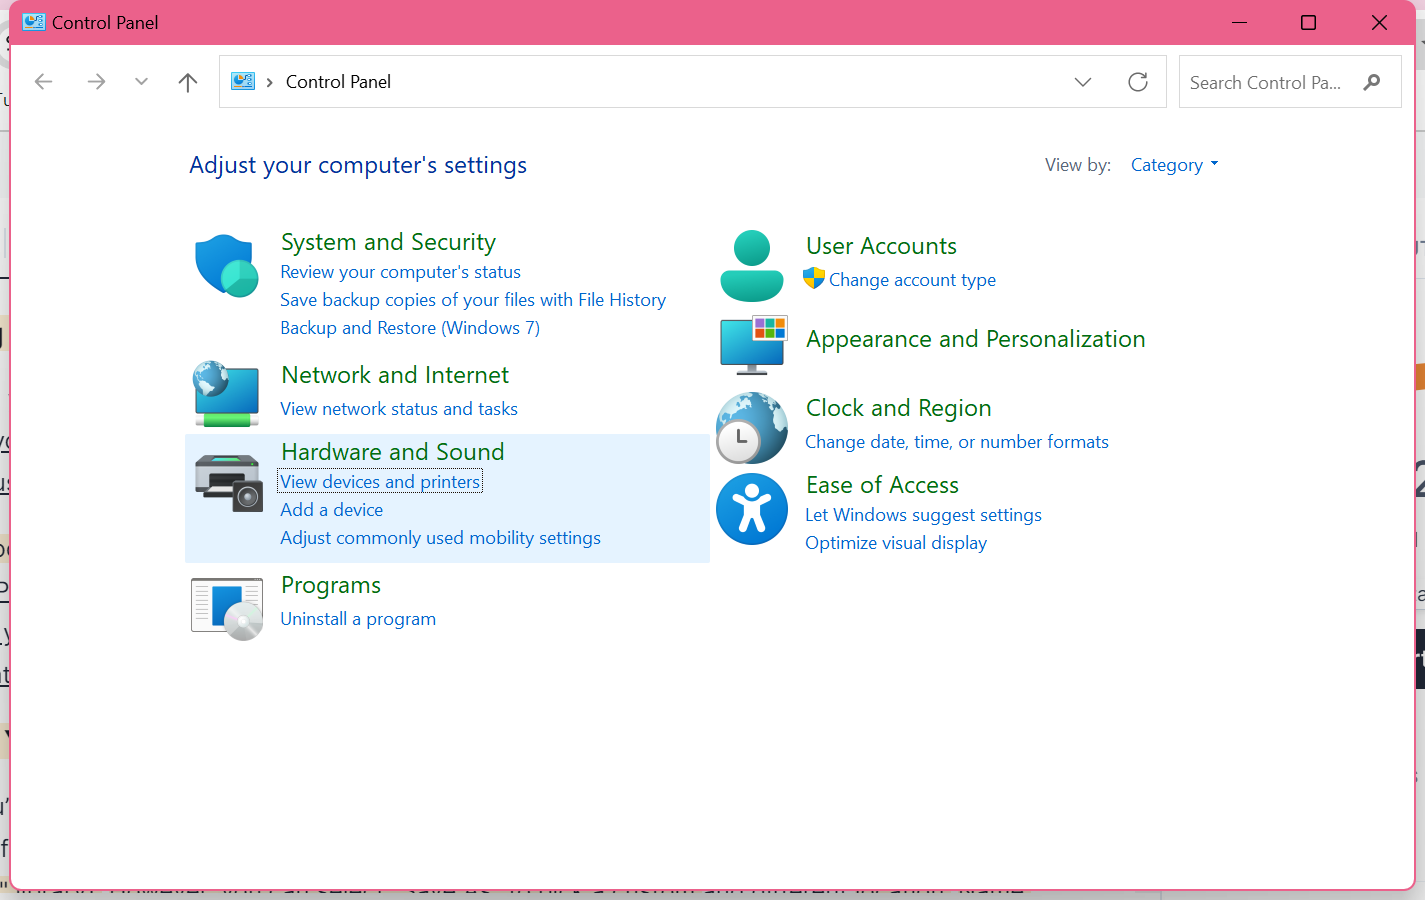
On the other hand, if you are not using “Windows Fax and Scan”, you can still access your scanner through the Control Panel, then select your device in the “Devices and Printers”. After, right click on your printer and choose “Start Scan”. This will then let you adjust settings like color mode, paper size, and resolution before you start.

Setting Up Your Scan: Resolution, File Format, and Scan Settings
Now that you’re in the scanning tool, it’s time to customize your scan. To get high-quality scanned images, you can set the resolution to at least 300 dpi. If you are scanning for detailed documents or images, use 600 dpi, but this will probably create larger files.
Then you need to choose the file format. If you are scanning documents, PDF is the most versatile, but you can use JPEG or PNG if you’re scanning photos. Make sure to adjust your other scan settings depending on the needs of your documents. Lastly, click “Preview” to check how your scanned document or scanned image will look and adjust the document if needed.
Saving Your Scanned Documents
Once you’re happy with the scan preview, hit “Scan.” After scanning, you’ll be prompted to save the scanned file. Windows will automatically choose a default folder usually in the Documents or Pictures folder. But just select “Save As” to pick a custom location. Name your scanned document too and your scan is complete.
Troubleshooting Common Scanning Issues

Although everything may seem to be set up perfectly, sometimes, scanning can still have problems and issues. Don’t worry, though! Most of these issues are easy to fix once you where to look. Here are some of the common problems and how to handle them:
Printer Not Recognized by the Computer
One of the most frustrating problems you can encounter with printing is when the computer doesn’t recognise your printer. If you encounter this, check the connection. If you’re using a USB connection, unplug and plug it back in to make sure it is properly connected. For Wi-Fi-enabled printers, make sure both your computer and printer are on the same network—this is a common oversight.
If the problems persist despite the connection, you can try reinstalling the printer driver. You can visit the manufacturer’s website, download the latest drivers, and install them. After installing, restart your computer and then check if your printer is on the list of devices.
Solving Network Connection Issues with Wi-Fi-Enabled Printers
For Wi-Fi-connected printers, network hiccups can be a real headache. If your printer isn’t showing up, verify that the printer is connected to your Wi-Fi network. Most printers have a small display screen available for you to view the network status. If the connection is weak or frequently drops, you can move the printer closer to you router or you can consider using an Ethernet cable for a more stable connection.
Restarting both your router and printer can also help resolve network issues. If you’re still facing problems, check your firewall settings on the computer; sometimes, these can block the printer’s connection.
What to Do When Scanning Software is Not Responding
At times, the scanning application can act stubbornly and not work as expected. If the scanning app freezes or fails to launch attempt to close, try to restart your computer. However, if the issue continues, consider uninstalling and then reinstalling the scanning software. For Windows users, this could involve reinstalling “Windows Fax and Scan” or the software specifically designed for your printer. On the other hand, in the case of a Mac system, reinstall the “Image Capture” app if needed.
Moreover, if none of these work, you may need to use a different scanning tool. For Windows, “Windows Scan” (available in the Microsoft store” is a great alternative, too. On Mac, you can use “Preview” for scanning.
Advanced Scanning Tips for Better Results

Now that you’ve got the basics down, let’s dive into some advanced tips to make your scanning process even smoother. These tricks will help you get high-quality scans while saving time and keeping your files organized.
Choosing the Right File Format: PDF, JPG, or TIFF
The file format you choose makes a big difference, depending on what you’re scanning. For text-heavy documents, go with PDF—it’s easy to store, share, and even search through if you use Optical Character Recognition (OCR) software. If you’re scanning images or photos, JPEG is a good scan option due to its small file size, though some quality may be sacrificed. For high-quality images with no loss in detail, choose TIFF, but keep in mind that these files can get pretty large.
Using the Document Feeder for Efficient Scanning
Got a multi-page document? The automatic document feeder (ADF) is your best friend. Place your stack of papers into the ADF, and it will scan each page in order—no need to lift the scanner lid for each one. Just make sure your pages are aligned and free of staples or folds to avoid jams. Most scanning software will give you the option to combine all pages into one PDF, which is super handy.
Document Settings Calculator
Document Type:
Primary Purpose:
Recommended Settings
Customizing Scan Settings for Quality vs. Speed
If you’re scanning high-detail images, go for a higher resolution like 600 dpi for a sharper output. But keep in mind that increasing the dpi setting can cause the scanning process to run slower and lead to bigger file sizes. When scanning documents, you can choose for 300 dpi as it offers a mix of speed and quality. Also, you can configure the color settings: black and white for text documents, gray for documents mixed with text and images, and color mode for photos or important documents where color is important.
How to Scan a Document Directly into Cloud Storage or Email
Want to skip the step of saving files on your computer? Many scanning apps now let you send scanned files directly to cloud storage or email. If your printer’s software supports it, select the “Scan to Cloud” or “Scan to Email” option before scanning. You’ll usually be prompted to log in to your cloud service (like Google Drive, Dropbox) or enter an email address. This method is a game-changer when you need to share scanned files quickly.
Conclusion
Scanning from your printer to your computer doesn’t have to be a daunting task. With the right tools and a bit of knowledge from this guide, you can convert those physical documents into digital files just in a few minutes. Whether you are using Windows or Mac, this guide we made for you will help you understand everything to prepare you for fixing and common issues.
Remember, when you use the proper settings for the type of document you use, make the most out of the document feeders, and know when and how to use specific file formats will certainly make a difference in the quality and efficiency of your work. And remember, if you still have a hard time handling these issues, these troubleshooting tricks and our assistance will help you get back on track.
Ready to make your scanning process even easier? Contact Nimble Nerds, and we’ll walk you through it or offer personalized advice tailored to your specific setup. Happy scanning!
FAQs
To scan documents, place them on your scanner bed or ADF, use the scanning software on your computer (like Windows Fax and Scan or Mac’s Image Capture), select the desired settings, and hit “Scan.” Save the scanned document to your computer or send it to your cloud storage.
First, place your document on the scanner bed or in the ADF. Open the scanning software on your computer, select your scan settings, and scan the document. Save the scanned document or file to your computer in the desired location or upload it directly to a cloud service if your software supports it.
Install the Epson Scan software, place the document on the scanner, and open the Epson Scan app. Select your preferred settings, preview the scan if needed, and click “Scan.” Choose where to save the scanned file on your computer.
Use the HP Smart app or “Windows Fax and Scan” (on Windows) to scan from your HP Officejet printer. Place the document on the scanner bed or ADF, choose your settings in the software, and start the scan. Save the file to your computer or send it via email or cloud storage.
When something’s not working and you’ve tried everything, we step in. Our Sydney-based techs solve everyday computer problems with patience, clarity, and zero condescension.
Talk to a Computer Help Expert


